参照について
- 仮想ネットワークにリソースグループの情報を渡したり、サブネットに仮想ネットワークの情報を渡したりする必要がある
- コードから値にアクセスできるようにするために参照(reference)を使用する
<PROVIDER>_<TYEP>.<NAME>.<ATTRIBUTE>- PROVIDER
- プロバイダ名
- TYPE
- リソースの種類
- NAME
- リソースの名前(自分がコードの中で利用する用に設定した名前)
- ATTRIBUTE
- リソースの引数か、リソースによってエクスポートされた属性のいずれか
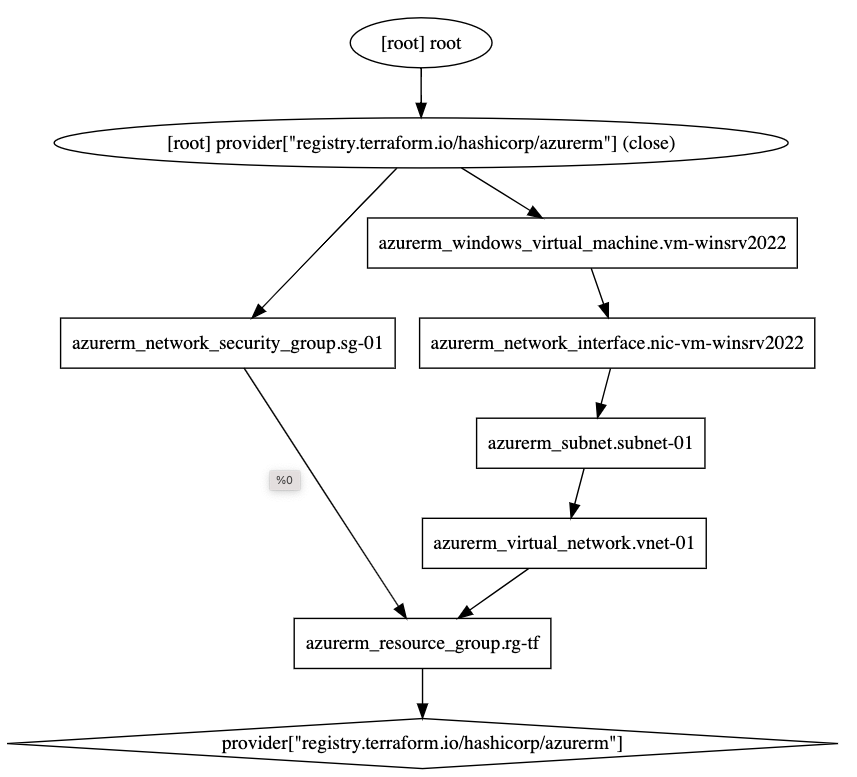
- あるリソースから他のリソースへ参照を追加すると、暗黙的依存(implicit dependency)が設定される
- Terraformはこれらの依存を構造分析し、そこから依存グラフを作成し、リソースをどの順番で作成すべきか自動的に判断するためにそのグラフを使用する。
- graphコマンドを実行することで、Terraformにこの依存グラフを表示させることも可能
- 後述を参照
VNetのデプロイ
- サブネットは仮想ネットワークのリソース宣言の中に書くか、独立したリソースとして書くか、あらかじめ決めておいた方が良さそうです
Terraform は現在、スタンドアロンのサブネット リソースと、仮想ネットワーク リソース内でサブネットをインラインで定義できるようにします。現時点では、インライン サブネットを持つ仮想ネットワークをサブネット リソースと組み合わせて使用することはできません。これを行うと、サブネット構成の競合が発生し、サブネットが上書きされます。
https://registry.terraform.io/providers/hashicorp/azurerm/latest/docs/resources/virtual_network
- DNSも同様に、仮想ネットワークのリソース宣言の中に書くか、独立したリソースとして書くか、あらかじめ決めておいた方が良さそうです
Terraform は現在、スタンドアロンの仮想ネットワーク DNS サーバー リソースと、仮想ネットワーク リソース内で DNS サーバーをインラインで定義できるようにします。現時点では、インライン DNS サーバーを備えた仮想ネットワークを仮想ネットワーク DNS サーバー リソースと組み合わせて使用することはできません。これを行うと、仮想ネットワーク DNS サーバー構成の競合が発生し、仮想ネットワーク DNS サーバーが上書きされます。
https://registry.terraform.io/providers/hashicorp/azurerm/latest/docs/resources/virtual_network
以下は、Terraformのドキュメントからコードを引用
https://registry.terraform.io/providers/hashicorp/azurerm/latest/docs/resources/virtual_network
- 仮想ネットワークが、リージョンやリソースグループ名を参照しています。サブネットがリソースグループ名や仮想ネットワーク名を参照しています
resource "azurerm_virtual_network" "example" {

name = "example-vnet"

address_space = ["10.0.0.0/16"]

location = azurerm_resource_group.example.location

resource_group_name = azurerm_resource_group.example.name

}

resource "azurerm_subnet" "example" {

name = "example-subnet"

resource_group_name = azurerm_resource_group.example.name

virtual_network_name = azurerm_virtual_network.example.name

address_prefixes = ["10.0.1.0/24"]

delegation {

name = "delegation"

service_delegation {

name = "Microsoft.ContainerInstance/containerGroups"

actions = ["Microsoft.Network/virtualNetworks/subnets/join/action", "Microsoft.Network/virtualNetworks/subnets/prepareNetworkPolicies/action"]

}

}

}

resource "azurerm_network_security_group" "example" {

name = "example-security-group"

location = azurerm_resource_group.example.location

resource_group_name = azurerm_resource_group.example.name

}
仮想マシンのデプロイ
- 今後は、「azurerm_linux_virtual_machine」もしくは「azurerm_windows_virtual_machine」を使った方が良いとのことです
The azurerm_virtual_machine resource has been superseded by the azurerm_linux_virtual_machine and azurerm_windows_virtual_machine resources. The existing azurerm_virtual_machine resource will continue to be available throughout the 3.x releases however is in a feature-frozen state to maintain compatibility – new functionality will instead be added to the azurerm_linux_virtual_machine and azurerm_windows_virtual_machine resources.
https://registry.terraform.io/providers/hashicorp/azurerm/latest/docs/resources/virtual_machine
以下は、Terraformのドキュメントからコードを引用
https://registry.terraform.io/providers/hashicorp/azurerm/latest/docs/resources/windows_virtual_machine
- NICがサブネットIDを参照しています
- 仮想マシンがリソースグループ名やリソースグループのリージョンを参照しています
resource "azurerm_network_interface" "example" {

name = "example-nic"

location = azurerm_resource_group.example.location

resource_group_name = azurerm_resource_group.example.name

ip_configuration {

name = "internal"

subnet_id = azurerm_subnet.example.id

private_ip_address_allocation = "Dynamic"

}

}

resource "azurerm_windows_virtual_machine" "example" {

name = "example-machine"

resource_group_name = azurerm_resource_group.example.name

location = azurerm_resource_group.example.location

size = "Standard_F2"

admin_username = "adminuser"

admin_password = "P@$$w0rd1234!"

network_interface_ids = [

azurerm_network_interface.example.id,

]

os_disk {

caching = "ReadWrite"

storage_account_type = "Standard_LRS"

}

source_image_reference {

publisher = "MicrosoftWindowsServer"

offer = "WindowsServer"

sku = "2016-Datacenter"

version = "latest"

}

}
実際のコード
- 参照を活用して、前回から下記のように仮想ネットワーク、仮想マシンを作成するコードを追加しました
provider "azurerm" {
  features {}
  subscription_id = xxxxx
  client_id       = xxxxx
  client_secret   = xxxxx
  tenant_id       = xxxxx
}

resource "azurerm_resource_group" "rg-tf" {
  name = "rg.tf"
  location = "Japaneast"

    tags = {
    environment = "Staging"
  }
}

resource "azurerm_virtual_network" "vnet-01" {
  name                = "vnet-01"
  address_space       = ["10.0.0.0/16"]
  location            = azurerm_resource_group.rg-tf.location
  resource_group_name = azurerm_resource_group.rg-tf.name
}

resource "azurerm_subnet" "subnet-01" {
  name                 = "subnet-01"
  resource_group_name  = azurerm_resource_group.rg-tf.name
  virtual_network_name = azurerm_virtual_network.vnet-01.name
  address_prefixes     = ["10.0.1.0/24"]
}

resource "azurerm_network_security_group" "nsg-01" {
  name                = "nsg-01"
  location            = azurerm_resource_group.rg-tf.location
  resource_group_name = azurerm_resource_group.rg-tf.name
}

resource "azurerm_network_interface" "nic-vm-winsrv2022" {
  name                = "nic-vm-winsrv2022"
  location            = azurerm_resource_group.rg-tf.location
  resource_group_name = azurerm_resource_group.rg-tf.name

  ip_configuration {
    name                          = "internal"
    subnet_id                     = azurerm_subnet.subnet-01.id
    private_ip_address_allocation = "Dynamic"
  }
}

resource "azurerm_windows_virtual_machine" "vm-winsrv2022" {
  name                = "vm-winsrv2022"
  resource_group_name = azurerm_resource_group.rg-tf.name
  location            = azurerm_resource_group.rg-tf.location
  size                = "Standard_A1"
  admin_username      = "adminuser"
  admin_password      = "P@$$w0rd1234!"
  network_interface_ids = [
    azurerm_network_interface.nic-vm-winsrv2022.id,
  ]

  os_disk {
    caching              = "ReadWrite"
    storage_account_type = "Standard_LRS"
  }

  source_image_reference {
    publisher = "MicrosoftWindowsServer"
    offer     = "WindowsServer"
    sku       = "2022-Datacenter"
    version   = "latest"
  }
}
依存グラフの出力
- 下記サイトでグラフを出力することができる
- terraform graphコマンドで出力されたものをコピペすれば良い
- 今回のコードでは下記のようなグラフとなる

リソースのデプロイ
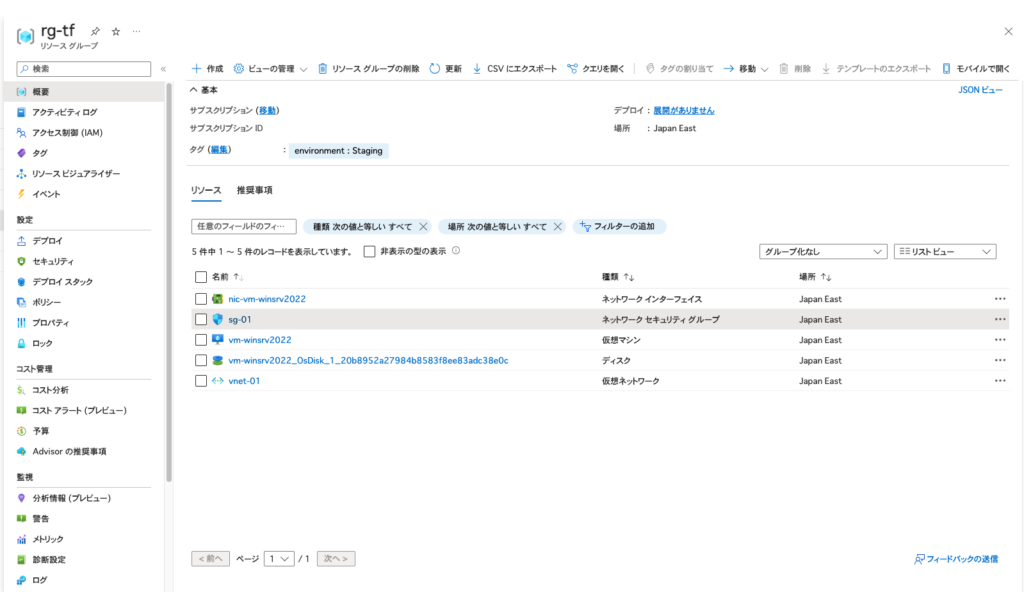
- 最後にリソースをデプロイし、仮想ネットワークと仮想マシンをTerraformで作成する
$ terraform apply

Terraform will perform the following actions:

# azurerm_network_interface.nic-vm-winsrv2022 will be created

〜〜〜〜〜〜

# azurerm_network_security_group.sg-01 will be created

〜〜〜〜〜〜

# azurerm_subnet.subnet-01 will be created

〜〜〜〜〜〜

# azurerm_virtual_network.vnet-01 will be created

〜〜〜〜〜〜

# azurerm_windows_virtual_machine.vm-winsrv2022 will be created

〜〜〜〜〜〜

Plan: 5 to add, 0 to change, 0 to destroy.- 無事に仮想ネットワークと仮想マシンが作成できました


